
在软件业,AOP为Aspect Oriented Programming的缩写,意为:面向切面编程,通过预编译方式和运行期动态代理实现程序功能的统一维护的一种技术。AOP是OOP的延续,是软件开发中的一个热点,也是Spring框架中的一个重要内容,是函数式编程的一种衍生范型。利用AOP可以对业务逻辑的各个部分进行隔离,从而使得业务逻辑各部分之间的耦合度降低,提高程序的可重用性,同时提高
了开发的效率。
找了一些资料,混合着我的理解补充。
Spring AOP 简介
如果说 IoC 是 Spring 的核心,那么面向切面编程就是 Spring 最为重要的功能之一了,在数据库事务中切面编程被广泛使用。
AOP 即 Aspect Oriented Program 面向切面编程
首先,在面向切面编程的思想里面,把功能分为核心业务功能,和周边功能。
- 所谓的核心业务,比如登陆,增加数据,删除数据都叫核心业务
- 所谓的周边功能,比如性能统计,日志,事务管理等等
周边功能在 Spring 的面向切面编程AOP思想里,即被定义为切面
在面向切面编程AOP的思想里面,核心业务功能和切面功能分别独立进行开发,然后把切面功能和核心业务功能 “编织” 在一起,这就叫AOP。
AOP 的目的
AOP能够将那些与业务无关,却为业务模块所共同调用的逻辑或责任(例如事务处理、日志管理、权限控制等)封装起来,便于减少系统的重复代码,降低模块间的耦合度,并有利于未来的可拓展性和可维护性。
AOP 当中的概念:
- 切入点(Pointcut)
在哪些类,哪些方法上切入(where) - 通知(Advice)
在方法执行的什么实际(when:方法前/方法后/方法前后)做什么(what:增强的功能) - 切面(Aspect)
切面 = 切入点 + 通知,通俗点就是:在什么时机,什么地方,做什么增强! - 织入(Weaving)
把切面加入到对象,并创建出代理对象的过程。(由 Spring 来完成)
一个例子
为了更好的说明 AOP 的概念,我们来举一个实际中的例子来说明:
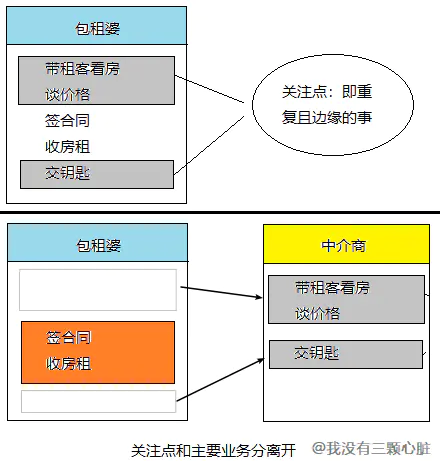
在上面的例子中,包租婆的核心业务就是签合同,收房租,那么这就够了,灰色框起来的部分都是重复且边缘的事,交给中介商就好了,这就是 AOP 的一个思想:让关注点代码与业务代码分离!
实际的代码
我们来实际的用代码感受一下
1.在 Package【pojo】下新建一个【Landlord】类(我百度翻译的包租婆的英文):
package pojo;

import org.springframework.stereotype.Component;

@Component("landlord")
public class Landlord {

    public void service() {
        // 仅仅只是实现了核心的业务功能
        System.out.println("签合同");
        System.out.println("收房租");
    }
}
2.在 Package【aspect】下新建一个中介商【Broker】类(我还是用的翻译…):
package aspect;

import org.aspectj.lang.annotation.After;
import org.aspectj.lang.annotation.Aspect;
import org.aspectj.lang.annotation.Before;
import org.springframework.stereotype.Component;

@Component
@Aspect
class Broker {

    @Before("execution(* pojo.Landlord.service())")
    public void before(){
        System.out.println("带租客看房");
        System.out.println("谈价格");
    }

    @After("execution(* pojo.Landlord.service())")
    public void after(){
        System.out.println("交钥匙");
    }
}
3.在 applicationContext.xml 中配置自动注入,并告诉 Spring IoC 容器去哪里扫描这两个 Bean:
<?xml version="1.0" encoding="UTF-8"?>
<beans xmlns="http://www.springframework.org/schema/beans"
       xmlns:xsi="http://www.w3.org/2001/XMLSchema-instance"
       xmlns:context="http://www.springframework.org/schema/context"
       xmlns:aop="http://www.springframework.org/schema/aop"
       xsi:schemaLocation="http://www.springframework.org/schema/beans
       http://www.springframework.org/schema/beans/spring-beans.xsd http://www.springframework.org/schema/context http://www.springframework.org/schema/context/spring-context.xsd http://www.springframework.org/schema/aop http://www.springframework.org/schema/aop/spring-aop.xsd">

    <context:component-scan base-package="aspect" />
    <context:component-scan base-package="pojo" />

    <aop:aspectj-autoproxy/>
</beans>
4.在 Package【test】下编写测试代码:
package test;

import org.springframework.context.ApplicationContext;
import org.springframework.context.support.ClassPathXmlApplicationContext;
import pojo.Landlord;

public class TestSpring {

    public static void main(String[] args) {

        ApplicationContext context =
                new ClassPathXmlApplicationContext("applicationContext.xml");
        Landlord landlord = (Landlord) context.getBean("landlord", Landlord.class);
        landlord.service();

    }
}
5.执行看到效果:
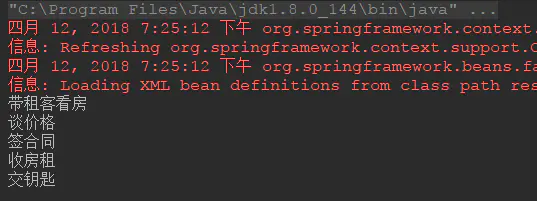
这个例子使用了一些注解,现在看不懂没有关系,但我们可以从上面可以看到,我们在 Landlord 的 service() 方法中仅仅实现了核心的业务代码,其余的关注点功能是根据我们设置的切面自动补全的。
使用注解来开发 Spring AOP
使用注解的方式已经逐渐成为了主流,所以我们利用上面的例子来说明如何用注解来开发 Spring AOP
第一步:选择连接点
Spring 是方法级别的 AOP 框架,我们主要也是以某个类额某个方法作为连接点,另一种说法就是:选择哪一个类的哪一方法用以增强功能。
    ....
    public void service() {
        // 仅仅只是实现了核心的业务功能
        System.out.println("签合同");
        System.out.println("收房租");
    }
    ....
我们在这里就选择上述 Landlord 类中的 service() 方法作为连接点。
第二步:创建切面
选择好了连接点就可以创建切面了,我们可以把切面理解为一个拦截器,当程序运行到连接点的时候,被拦截下来,在开头加入了初始化的方法,在结尾也加入了销毁的方法而已,在 Spring 中只要使用 @Aspect 注解一个类,那么 Spring IoC 容器就会认为这是一个切面了:
package aspect;

import org.aspectj.lang.annotation.After;
import org.aspectj.lang.annotation.Aspect;
import org.aspectj.lang.annotation.Before;
import org.springframework.stereotype.Component;

@Component
@Aspect
class Broker {

    @Before("execution(* pojo.Landlord.service())")
    public void before(){
        System.out.println("带租客看房");
        System.out.println("谈价格");
    }

    @After("execution(* pojo.Landlord.service())")
    public void after(){
        System.out.println("交钥匙");
    }
}
- 注意: 被定义为切面的类仍然是一个 Bean ,需要
@Component注解标注
代码部分中在方法上面的注解看名字也能猜出个大概,下面来列举一下 Spring 中的 AspectJ 注解:
| 注解 | 说明 |
|---|---|
@Before | 前置通知,在连接点方法前调用 |
@Around | 环绕通知,它将覆盖原有方法,但是允许你通过反射调用原有方法,后面会讲 |
@After | 后置通知,在连接点方法后调用 |
@AfterReturning | 返回通知,在连接点方法执行并正常返回后调用,要求连接点方法在执行过程中没有发生异常 |
@AfterThrowing | 异常通知,当连接点方法异常时调用 |
有了上表,我们就知道 before() 方法是连接点方法调用前调用的方法,而 after() 方法则相反,这些注解中间使用了定义切点的正则式,也就是告诉 Spring AOP 需要拦截什么对象的什么方法,下面讲到。
第三步:定义切点
在上面的注解中定义了 execution 的正则表达式,Spring 通过这个正则表达式判断具体要拦截的是哪一个类的哪一个方法:
execution(* pojo.Landlord.service())依次对这个表达式作出分析:
- execution:代表执行方法的时候会触发
*:代表任意返回类型的方法- pojo.Landlord:代表类的全限定名
- service():被拦截的方法名称
通过上面的表达式,Spring 就会知道应该拦截 pojo.Lnadlord 类下的 service() 方法。上面的演示类还好,如果多出都需要写这样的表达式难免会有些复杂,我们可以通过使用 @Pointcut 注解来定义一个切点来避免这样的麻烦:
package aspect;

import org.aspectj.lang.annotation.After;
import org.aspectj.lang.annotation.Aspect;
import org.aspectj.lang.annotation.Before;
import org.aspectj.lang.annotation.Pointcut;
import org.springframework.stereotype.Component;

@Component
@Aspect
class Broker {

    @Pointcut("execution(* pojo.Landlord.service())")
    public void lService() {
    }

    @Before("lService()")
    public void before() {
        System.out.println("带租客看房");
        System.out.println("谈价格");
    }

    @After("lService()")
    public void after() {
        System.out.println("交钥匙");
    }
}
第四步:测试 AOP
环绕通知
我们来探讨一下环绕通知,这是 Spring AOP 中最强大的通知,因为它集成了前置通知和后置通知,它保留了连接点原有的方法的功能,所以它及强大又灵活,让我们来看看:
package aspect;

import org.aspectj.lang.ProceedingJoinPoint;
import org.aspectj.lang.annotation.Around;
import org.aspectj.lang.annotation.Aspect;
import org.springframework.stereotype.Component;

@Component
@Aspect
class Broker {

//  注释掉之前的 @Before 和 @After 注解以及对应的方法
//  @Before("execution(* pojo.Landlord.service())")
//  public void before() {
//      System.out.println("带租客看房");
//      System.out.println("谈价格");
//  }
//
//  @After("execution(* pojo.Landlord.service())")
//  public void after() {
//      System.out.println("交钥匙");
//  }

    //  使用 @Around 注解来同时完成前置和后置通知
    @Around("execution(* pojo.Landlord.service())")
    public void around(ProceedingJoinPoint joinPoint) {
        System.out.println("带租客看房");
        System.out.println("谈价格");

        try {
            joinPoint.proceed();
        } catch (Throwable throwable) {
            throwable.printStackTrace();
        }

        System.out.println("交钥匙");
    }
}
运行测试代码,结果仍然正确.
使用 XML 配置开发 Spring AOP
注解是很强大的东西,但基于 XML 的开发我们仍然需要了解,我们先来了解一下 AOP 中可以配置的元素:
| AOP 配置元素 | 用途 | 备注 |
|---|---|---|
aop:advisor | 定义 AOP 的通知其 | 一种很古老的方式,很少使用 |
aop:aspect | 定义一个切面 | —— |
aop:before | 定义前置通知 | —— |
aop:after | 定义后置通知 | —— |
aop:around | 定义环绕通知 | —— |
aop:after-returning | 定义返回通知 | —— |
aop:after-throwing | 定义异常通知 | —— |
aop:config | 顶层的 AOP 配置元素 | AOP 的配置是以它为开始的 |
aop:declare-parents | 给通知引入新的额外接口,增强功能 | —— |
aop:pointcut | 定义切点 | —— |
有了之前通过注解来编写的经验,并且有了上面的表,我们将上面的例子改写成 XML 配置很容易(去掉所有的注解):
<!-- 装配 Bean-->
<bean name="landlord" class="pojo.Landlord"/>
<bean id="broker" class="aspect.Broker"/>

<!-- 配置AOP -->
<aop:config>
    <!-- where:在哪些地方(包.类.方法)做增加 -->
    <aop:pointcut id="landlordPoint"
                  expression="execution(* pojo.Landlord.service())"/>
    <!-- what:做什么增强 -->
    <aop:aspect id="logAspect" ref="broker">
        <!-- when:在什么时机(方法前/后/前后) -->
        <aop:around pointcut-ref="landlordPoint" method="around"/>
    </aop:aspect>
</aop:config>
作者:我没有三颗心脏
IDEA配置
在创建项目时点击Spring项目即可快速创建。IDEA可以少导入很多jar包的,这里我添加进去缺少的两个。
<dependency>
            <groupId>commons-dbcp</groupId>
            <artifactId>commons-dbcp</artifactId>
            <version>[1.4,)</version>
        </dependency>
        <dependency>
            <groupId>org.aspectj</groupId>
            <artifactId>aspectjweaver</artifactId>
            <version>1.9.5</version>
        </dependency>
        <dependency>
            <groupId>mysql</groupId>
            <artifactId>mysql-connector-java</artifactId>
            <version>8.0.20</version>
        </dependency>
关于数据库的配置,例子里虽然没有用到:
<tx:annotation-driven transaction-manager="transactionManager"/>
<bean id="transactionManager" class="org.springframework.jdbc.datasource.DataSourceTransactionManager">
<property name="dataSource" ref="mysql"/>
</bean>
<bean id="mysql" class="org.apache.commons.dbcp.BasicDataSource">
<property name="driverClassName" value="com.mysql.cj.jdbc.Driver"/>
<!-- schema_person是模式名,cj版本的驱动必须提前设置好时区-->
<property name="url"
value="jdbc:mysql://localhost:3306/jd_schema?useUnicode=true&characterEncoding=UTF-8&serverTimezone=UTC"/>
<property name="username" value="root"/>
<property name="password" value=" "/>
</bean>创建项目的时候分号包。
- aop中存放需要织入的方法
- dao中存放Dao层的接口,对数据库的操作
- entity存放实体类型
- impl存放实现类
- service存放主要实现代码

后置通知
后置通知和前置通知类似,接口更换为:
AfterReturningAdvice